


![图片[1]-WordPress调用最新编辑及修改的文章列表图文教程-搬主题](https://cdn.banzhuti.com/2021/08/20210813131203782.jpg)
对于做软件或者经常需要更新版本的WordPress站点来说,经常需要更新文章的标题及内容,但是这篇文章又是比较久之前发布的,就算内容重新调整及更新了,想要把调整后的文章列表展示出来,受限于原来的功能,很多时候是展示不了的。搬主题经过测试及了解,给出相应的解决办法,分享给大家WordPress调用最新编辑及修改的文章列表图文教程。
首先,大家都知道大部分WordPress主题及WordPress插件展示出来的文章列表都是使用最近更新、浏览最多、评论最多等作为排序,怎样设置文章列表的展示为最新编辑的文章或者最新修改的文章进行排序,这样只要自己文章有更新,那列表自动会进行排序。
方法1:
首先还是给WordPress的主题的function.php文件内添加以下功能代码:
// 最近编辑过的文章
function recently_updated_posts($num=10,$days=7) {
if( !$recently_updated_posts = get_option('recently_updated_posts') ) {
query_posts('post_status=publish&orderby=modified&posts_per_page=-1');
$i=0;
while ( have_posts() && $i<$num ) : the_post();
if (current_time('timestamp') - get_the_time('U') > 60*60*24*$days) {
$i++;
$the_title_value=get_the_title();
$recently_updated_posts.='<li><i class="icon-cai"></i><a href="'.get_permalink().'" title="最终修改于'.get_the_modified_time('Y.m.d G:i').'">'.$the_title_value.'</a></li>';
}
endwhile;
wp_reset_query();
if ( !empty($recently_updated_posts) ) update_option('recently_updated_posts', $recently_updated_posts);
}
$recently_updated_posts=($recently_updated_posts == '') ? '<li>请拭目以待.</li>' : $recently_updated_posts;
echo $recently_updated_posts;
}
function clear_cache_zww() {
update_option('recently_updated_posts', '');
// 清空缓存}add_action('save_post', 'clear_cache_zww'); ///修改文章时触发清空缓存
保存后,然后在前端页面展示调用的PHP文件代码里添加如下调用代码:
<ul><?php if ( function_exists('recently_updated_posts') ) recently_updated_posts(5,30); ?></ul>以上5表示调用五篇,30表示在30天之内编辑过的文章。这功能是带有缓存的,只有后台重新编辑文章之后才会清除缓存,这就节省了许多数据库查询工作,前台完全是静态展示。
对于一些WordPress主题自带的侧边栏展示文章的,如何调整呢。这里看搬主题分享的第二个方法
方法2
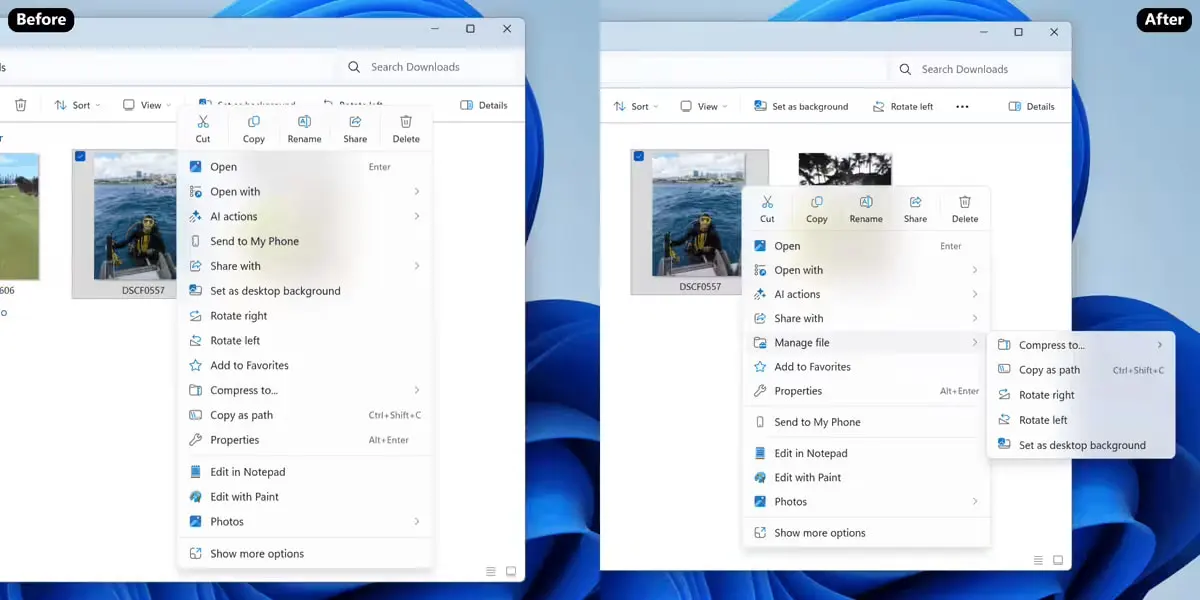
首先,在你的WordPress主题文件(通常是functions.php)中,找到名为dtheme_posts_list的函数。在该函数的$args数组中,将’orderby’的值设置为’modified’,以便按照最后修改时间进行排序。删除或注释掉与浏览量相关的代码,因为我们不需要它。
以DUX主题为准,直接找到widget-posts.php文件,打开后,其中部分原代码如下:
function dtheme_posts_list($orderby,$limit,$cat,$img,$comn) {
	$args = array(
		'order'            => 'DESC',
		'cat'              => $cat,
		'showposts'        => $limit,
		'ignore_sticky_posts' => 1
	);

	if( $orderby !== 'views' ){
		$args['orderby'] = $orderby;
	}else{
		$args['orderby'] = 'meta_value_num';
		$args['meta_query'] = array(
            array(
				'key'   => 'views',
				'order' => 'DESC'
            )
        );
	}

	query_posts($args);
	while (have_posts()) : the_post();
?>
<li><a<?php echo _post_target_blank() ?> href="<?php the_permalink(); ?>"><?php if( $img ){echo '<span class="thumbnail">'; echo _get_post_thumbnail(); echo '</span>'; }else{$img = '';} ?><span class="text"><?php the_title(); ?><?php echo get_the_subtitle() ?></span><span class="muted"><?php the_time('Y-m-d');?></span><?php if($comn){ ?><span class="muted"><?php echo '评论(', comments_number('0', '1', '%'), ')'; ?></span><?php }?></a></li>
<?php

    endwhile; wp_reset_query();
}
修改成如下代码:
function dtheme_posts_list($orderby,$limit,$cat,$img,$comn) {
	$args = array(
		'order'            => 'DESC',
		'cat'              => $cat,
		'showposts'        => $limit,
		'ignore_sticky_posts' => 1,
		'orderby'          => 'modified'  // 增加此处
	);

	//if( $orderby !== 'views' ){
	//	$args['orderby'] = $orderby;
	//}else{
	//	$args['orderby'] = 'meta_value_num';
	//	$args['meta_query'] = array(
      //      array(
			//	'key'   => 'views',
			//	'order' => 'DESC'
   //         )
     //   );
//	}

	query_posts($args);
	while (have_posts()) : the_post();
?>
<li><a<?php echo _post_target_blank() ?> href="<?php the_permalink(); ?>"><?php if( $img ){echo '<span class="thumbnail">'; echo _get_post_thumbnail(); echo '</span>'; }else{$img = '';} ?><span class="text"><?php the_title(); ?><?php echo get_the_subtitle() ?></span><span class="muted"><?php the_time('Y-m-d');?></span><?php if($comn){ ?><span class="muted"><?php echo '评论(', comments_number('0', '1', '%'), ')'; ?></span><?php }?></a></li>
<?php

    endwhile; wp_reset_query();
}
最终如下:
![图片[2]-WordPress调用最新编辑及修改的文章列表图文教程-搬主题](https://cdn.banzhuti.com/2023/07/20230721002155822.jpg)
接下来,找到widget_ui_posts类中的form方法,修改下拉选项中的”发布时间”选项的值为”修改时间”,以便在后台控件中显示正确的排序选项。
原代码为:
<p>
			<label>
				排序:
				<select style="width:100%;" id="<?php echo $this->get_field_id('orderby'); ?>" name="<?php echo $this->get_field_name('orderby'); ?>" style="width:100%;">
					<option value="comment_count" <?php selected('comment_count', $instance['orderby']); ?>>评论数</option>
					<option value="views" <?php selected('views', $instance['orderby']); ?>>浏览量</option>
					<option value="date" <?php selected('date', $instance['orderby']); ?>>发布时间</option>
					<option value="rand" <?php selected('rand', $instance['orderby']); ?>>随机</option>
				</select>
			</label>
		</p>
将其中的 date 改为 modified ,最终改为如下:
<p>
			<label>
				排序:
				<select style="width:100%;" id="<?php echo $this->get_field_id('orderby'); ?>" name="<?php echo $this->get_field_name('orderby'); ?>" style="width:100%;">
					<option value="comment_count" <?php selected('comment_count', $instance['orderby']); ?>>评论数</option>
					<option value="views" <?php selected('views', $instance['orderby']); ?>>浏览量</option>
					<option value="modified" <?php selected('modified', $instance['orderby']); ?>>发布时间</option>
					<option value="rand" <?php selected('rand', $instance['orderby']); ?>>随机</option>
				</select>
			</label>
		</p>
改后的代码
![图片[3]-WordPress调用最新编辑及修改的文章列表图文教程-搬主题](https://cdn.banzhuti.com/2023/07/20230721002202867.jpg)
保存后,重启PHP,刷新自己的WordPress网站缓存就可以看到效果了。
















暂无评论内容